How to set up conditions for the Intercom
IMPORTANT: The Intercom functionality of LearningSpace requires the web browser to have access to the microphone of the client PC, which in turn requires a secure HTTPS connection to the LearningSpace server.
That is, the client computer's microphone can only be used with a valid SSL certificate. (This restriction stems from the Chrome browser security regulations.)
The Intercom feature requires certain technical setups to be completed. For the announcements to be sent, the relevant destination has to be physically connected and assigned within the software.
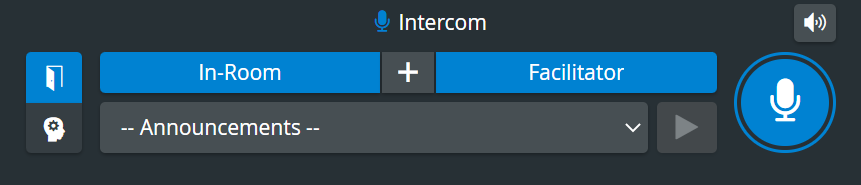
In-Room - the Room button sends announcements to the simulation area
In case no network speakers are used as intercom devices, a DAK (Digital Audio Kit) has to be connected and assigned to the Room (corresponding to the simulation area) via the Rooms tab of the System module as a Separate In-room Intercom device
Facilitator—A device (e.g. headset) can be connected for direct communication with the facilitator. This device can be assigned to the room as a Separate Hallway intercom device via the Rooms tab of the System module.
Simulator - A Maestro-ready simulator can be connected to send announcements through the manikin ("Voice of Patient").
Once the simulator is connected, the Intercom is also connected for the manikin.
The Push-to-Talk function of Intercom is not supported on iPads in LearningSpace.
The Intercom via Simulator functionality is not available for third-party Simulators.
For further info on using the Intercom feature, see How can I add new/ customized intercom announcements?
See also our Practical Recording and Recording Module pages and watch our related Training Videos.