How to use the Send to Screen function
Two ways of using Send to Screen
There are two kinds of output for the Send to Screen function:
Display monitor
TouchPro Patient monitor of the JUNO simulator
Content upload
Content can only be uploaded
within an SCE (for the display monitor)
or via Maestro (for the JUNO/Patient monitor).
In the former case, for the content to be available, the SCE, including that content, must be assigned to the recording. An SCE can only be linked to a recording by scheduling an event; consequently, the Send to Screen feature is only possible via Event for recording.
If a JUNO simulator (Maestro-based) is connected, content uploaded via Maestro will be available for sending.
Criteria for the function to work
Content has to be uploaded within a specific SCE or via Maestro (to the JUNO simulator)
A monitor/ decoder AND/ OR JUNO simulator connected and assigned to the room
An event has to be scheduled in that specific room with that specific SCE assigned to it
The Send to Screen function is only available for Elevate Healthcare simulators, not third-party simulators.
Uploading content
Within the SCE Management module, navigate to the Edit SCE surface of the desired SCE by highlighting it and clicking the Edit SCE button in the top right corner of the SCE Details panel.
Open the Media tab by clicking the corresponding title on the left.
Drag and drop or browse and select the file you intend to upload.

Assigning a device for displaying the content
On the Rooms tab of the System module, click the cogwheel for the desired room.
In the Room Settings pop-up, select the device to display the content from the Send to Screen source drop-down(s).

NOTE: Monitors used for displaying content are treated as cameras in LearningSpace; therefore, connecting such a device must be completed on the Cameras tab.
IMPORTANT: The TouchPro Patient monitor can only be assigned as a Send to Screen destination in the Send to Screen source #2 drop-down menu (the second drop-down).

Save the setup.
IMPORTANT: When scheduling the event, make sure that the room to which the displaying device has been assigned is used as the location of the scheduled simulation event.
Recording Scheduled Events
See the relevant description about scheduling an event.

Send to Screen - from SCE
Once an event is scheduled in a room with a displaying device and an SCE containing the media is assigned, the uploaded media file will be displayed during the event's recording.
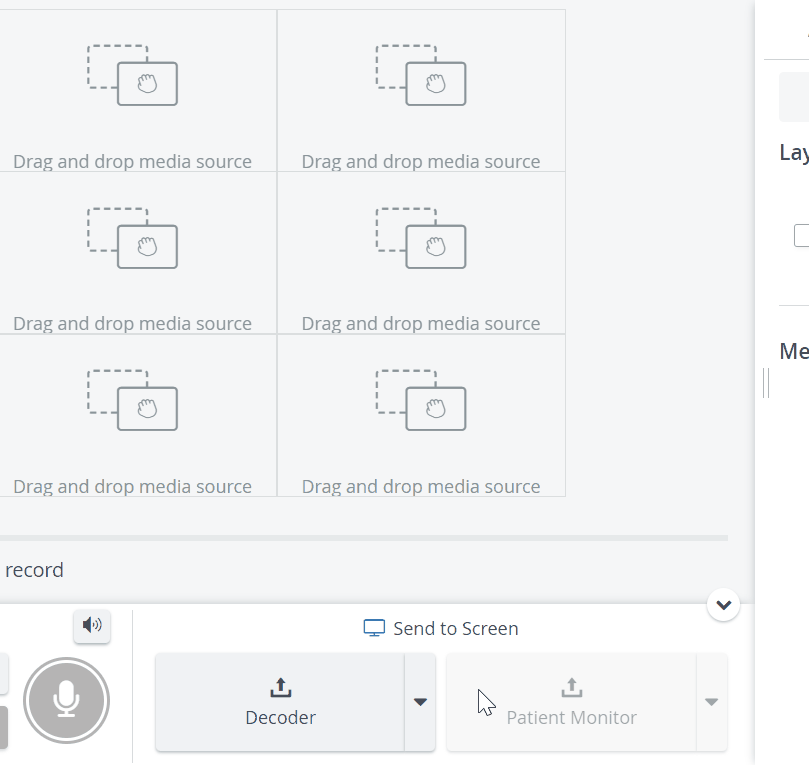

The Send to Screen widget can be minimized or hidden to utilize space on the screen better:

Send to Screen - from Simulator (Maestro)
NOTE: For the JUNO (Maestro) media content to be displayable, it is sufficient to connect the JUNO simulator (with media content); no SCE is required, so no scheduling is required; the content will be displayable once the recording is started (manually).
For more information, visit our Recording Module, Recording - FAQ, and Practical Recording pages.